如何使用AVCapturePhotoOutput的最佳照片功能

无论你的应用程序的主要焦点是捕捉令人惊叹的风景,还是只是一张无辜的自拍。对于开发者来说,重要的是让用户最大限度地利用相机,并且毫无痛苦。为此,苹果公司做了一项出色的展示工作AVCapturePhotoOutput在iOS 10.在本文中,我将展示如何实现它的一些特性。完整的项目可以从GitHub.
有什么新鲜事吗?
可以肯定的是,iOS应用程序以前可以使用摄像头。但是,该框架具有新的特性,并对现有的特性进行了改进。
- 生活的照片混合图片与短视频。这能让照片“生动起来”,更好地唤起记忆。
- 生现在可以拍照了。
- 缩略图当捕捉照片时,图像可用。这有助于向用户预览图像。
- 还有,你可以带广泛的颜色图片。
让我们开始吧。
简单的设置
为了保持重点,我没有包括设计的步骤ui.它可以从完整项目的故事板中复制,或者您可以根据自己的喜好定制设计。
从导入右边开始框架:
进口UIKit进口AVFoundation进口照片然后,声明以下变量和输出:
varcaptureSession=AVCaptureSession()varcameraOutput=AVCapturePhotoOutput()varpreviewLayer=AVCaptureVideoPreviewLayer()varcurrentImage:(图像:数据,imageName:字符串)?var预览=假varhighResolutionEnabled=真正的varrawEnabled=假var生活=.从varflashMode=AVCaptureFlashMode.从varcameraPosition=AVCaptureDevicePosition.回来@IBOutlet弱varcapturedButton:UIButton!@IBOutlet弱varpreviewView:UIView!@IBOutlet弱varmenuView:UIView!@IBOutlet弱vartoastLabel:UILabel!@IBOutlet弱varsaveButton:UIButton!LiveMode自定义enum。
枚举LiveMode{情况下在,从,不可用}在屏幕上显示一条消息a标签使用下面的函数显示。
函数showToast(文本:字符串){toastLabel.文本=文本UIView.动画(withDuration:1.0,动画:{自我.toastLabel.α=1.0})UIView.动画(withDuration:1.0,延迟:2.0,选项:.curveLinear,动画:{自我.toastLabel.α=0.0},完成:零)}现在我们准备继续。
权限
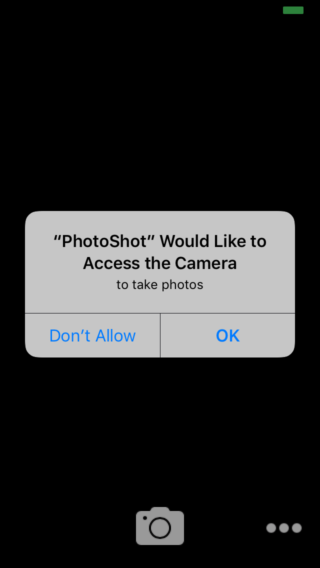
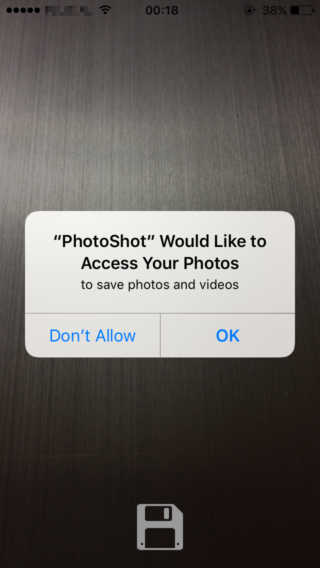
在iOS 10中,当请求访问敏感数据时,应该将描述字符串添加到info.plist文件,该文件将显示给用户,让他们知道您将如何处理数据。下面的键分别描述了照片库和相机的用法。这将帮助用户更好地理解为什么要访问这些组件。
<关键>NSPhotoLibraryUsageDescription关键><字符串>保存照片和视频字符串><关键>NSCameraUsageDescription关键><字符串>拍照字符串>第一次消息将显示如下截图。然后用户的选择将被记住。
载入相机
在用户可以与应用程序交互之前,相机应该加载。这是在viewDidLoad方法
覆盖函数viewDidLoad(){超级.viewDidLoad()loadCamera()}我们应该首先确保相机是可用的。的AVCaptureDevice使用用户设置的摄像机位置初始化。这将启动前置或后置摄像头。
函数loadCamera(){让设备=AVCaptureDevice.defaultDevice(withDeviceType:.builtInWideAngleCamera,mediaType:AVMediaTypeVideo,位置:cameraPosition)在使用captureSession,之前的任何输入都将被删除。当相机从前到后切换时,这是必需的,反之亦然。
captureSession.removeInput(captureSession.输入.第一个作为!AVCaptureInput!)添加cameraOutput到AVCaptureSession.这是我们检查是否生活的照片捕获是可用的,并已设置高分辨率捕获到用户的选择。
如果让输入=试一试?AVCaptureDeviceInput(设备:设备){如果(captureSession.canAddInput(输入)){captureSession.addInput(输入)如果(captureSession.canAddOutput(cameraOutput)){cameraOutput.isHighResolutionCaptureEnabled=自我.highResolutionEnabled captureSession.addOutput(cameraOutput)如果!cameraOutput.isLivePhotoCaptureSupported{自我.生活=.不可用}//接下来,previewLayer被设置为显示带有视图大小的摄像机内容。previewLayer=AVCaptureVideoPreviewLayer(会话:captureSession)previewLayer.框架=previewView.边界previewLayer.videoGravity=AVLayerVideoGravityResizeAspectFillpreviewView.clipsToBounds=真正的previewView.层.addSublayer(previewLayer)captureSession.startRunning()}}其他的{打印(“无法添加输出”)}}一个好的做法是停止captureSession当视图不再可见时:
覆盖函数viewDidDisappear(_动画:保龄球){如果captureSession.正在{captureSession.stopRunning()}其他的{captureSession.startRunning()}}现在我们有了摄像机。该拍照了。
第一次捕捉
要拍照,只需添加以下内容IBAction.当按下带有相机图标的按钮时触发此操作。紧随其后的是经典的相机快门音效。
@IBAction函数didPressTakePhoto(_发送方:UIButton){var设置=AVCapturePhotoSettings()cameraOutput.capturePhoto(与:设置,委托:自我)}在请求的参数中有两件事需要注意。设置是我们刚刚创建的对象(属性将在另一个步骤中添加)。的委托是AVCapturePhotoCaptureDelegate协议这类应该符合。这是在扩展班级的。
扩展ViewController: AVCapturePhotoCaptureDelegate {func capture(_ captureOutput: AVCapturePhotoOutput, didFinishProcessingPhotoSampleBuffer photoSampleBuffer: CMSampleBuffer?, previewPhotoSampleBuffer: CMSampleBuffer?,resolvedSettings: AVCaptureResolvedPhotoSettings, bracketSettings: AVCaptureBracketedStillImageSettings?, error: Error?) { if let error = error { print("Capture failed: \(error.localizedDescription)") } } }当所有进程完成并且照片准备就绪时,将调用此方法。
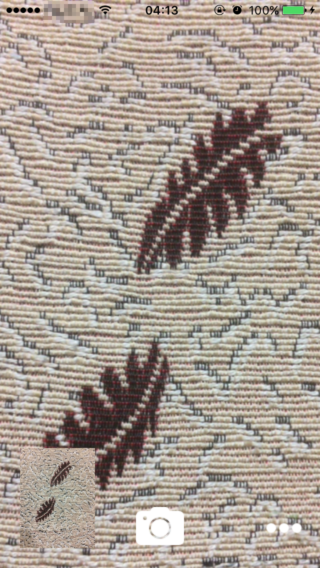
缩略图
抓拍照片时,自然要做的下一件事是显示预览。AVFoundation这很简单。它提供了指定图像尺寸的可能性,并在处理完成时获得预览。
我们只需要修改捕获函数上面显示的图像在左下角显示在照片中。
if let error = error {print("Capture failed: \(error. localizeddescription)")} if let sampleBuffer = photoSampleBuffer, let previewBuffer = previewPhotoSampleBuffer, let dataImage = AVCapturePhotoOutput . jpegphotodatarepresentation (forJPEGSampleBuffer: sampleBuffer, previewPhotoSampleBuffer: previewBuffer) {self。currentImage = (dataImage, "\(resolvedSettings.uniqueID).jpg") showImage()}这里缓冲区转换为a数据对象,并设置为当前图像。这个函数showImage只需要取这个对象并将其设置为capturedButton的形象。
func showImage() {let dataProvider = CGDataProvider(data: self.currentImage!. .cgImageRef: CGImage!= CGImage(jpegDataProviderSource: dataProvider!),decode: nil, shouldInterpolate: true, intent: .defaultIntent) let image = UIImage(cgImage: cgImageRef, scale: 1.0, orientation: UIImageOrientation.right) self.capturedButton.imageView?.contentMode = .scaleAspectFill self.capturedButton.setImage(image, for: .normal) self.capturedButton.isHidden = false }控件中添加预览格式,以设置预览的尺寸AVCapturePhotoSettings对象。
var settings = AVCapturePhotoSettings() let previewPixelType = settings. availablepreviewphotopixelformattypes .first!let previewFormat = [kCVPixelBufferPixelFormatTypeKey作为String: previewPixelType, kCVPixelBufferWidthKey作为String: self.capturedButton.frame.width, kcvpixelbufferhighkey作为String: self.capturedButton.frame.height]作为[String: Any]设置。previewPhotoFormat = previewFormat保存数据
控件时,在此项目中可使用将捕获的照片保存在库中的选项缩略图.一个简单的动画用于从缩略图到全屏的过渡,反之亦然。这也显示和隐藏保存按钮。
@IBAction func previewClicked() {UIView。动画(withDuration:0.5, animations: { if !self.previewing { self.capturedButton.frame = self.view.frame self.saveButton.isHidden = false } else { let x: CGFloat = 20.0 let y: CGFloat = self.view.frame.height - 100.0 - 20.0 self.capturedButton.frame = CGRect(x: x, y: y, width: 75.0, height: 100.0) self.saveButton.isHidden = true } }) previewing = !previewing }当保存按钮被点击,用户被要求许可访问照片库。只有当这个权限被授予时,我们才继续尝试保存照片。的showToast函数在主线程中被调用,因为它修改了UI。
@IBAction func saveclick () {if let image = currentImage {PHPhotoLibrary。requestAuthorization({(status) in if status == .authorized {do {try self。保存(形象:形象。图像,与Name: image.imageName) } catch let error { print(error.localizedDescription) } } else { DispatchQueue.main.async { self.showToast(text: "Not authorized!") } } }) } }最后,真正的工作是在保存函数。首先将图像保存到一个临时文件中。
func save(image: Data, withName: String)抛出{let url = url (fileURLWithPath: NSTemporaryDirectory(). appendpending (withName))尝试图像。写入(到:url,选项:.atomicWrite)然后,PHPhotoLibrary用于将映像添加为资源。的performChanges函数也有一个completionHandler进行UI更改或其他工作。
PHPhotoLibrary.shared()。performChanges({让request = PHAssetCreationRequest.forAsset() request.addResource(with: .photo, data: image, options: nil) let creationOptions = PHAssetResourceCreationOptions() creationOptions.shouldMoveFile = true request.addResource(with: .alternatePhoto, fileURL: url, options: nil) }, completionHandler: { (success, error) in if let error = error { print(error.localizedDescription) return }确保一切正常后,删除临时文件并显示成功消息。
if FileManager.default.fileExists(atPath: url. absolutestring) {do {try FileManager.default.removeItem(at: url)} catch let err {print(err. localizeddescription)}} DispatchQueue.main.async {self. savebutton . ishidden = true自我。showToast(text: "Image saved")}})
生
生图像捕捉,以及生活的照片,可在iPhone 6s、6s+、SE和9.7″iPad Pro上使用。生照片是未压缩的,每像素有更多的位,允许更多的编辑选项。
捕获一个生照片AVCaptureSessionPresetPhoto格式是必需的和后置摄像头。该代码与普通的图像捕获非常相似。的AVCapturePhotoSettings在这种情况下,初始化使用原始像素格式。
if rawEnabled {if let rawFormat = cameraOutput.availableRawPhotoPixelFormatTypes.first {settings = AVCapturePhotoSettings(rawPixelFormatType: OSType(rawFormat))}}现在将以下回调添加到类的扩展中。本例中的文件格式为.dng.
func capture(_ captureOutput: AVCapturePhotoOutput, didFinishProcessingRawPhotoSampleBuffer rawSampleBuffer: CMSampleBuffer?, previewPhotoSampleBuffer: CMSampleBuffer?,resolvedSettings: AVCaptureResolvedPhotoSettings, bracketSettings: AVCaptureBracketedStillImageSettings?, error: Error?) { if let error = error { print("Capture failed: \(error.localizedDescription)") } if let sampleBuffer = rawSampleBuffer, let previewBuffer = previewPhotoSampleBuffer, let dataImage = AVCapturePhotoOutput .dngPhotoDataRepresentation(forRawSampleBuffer: sampleBuffer, previewPhotoSampleBuffer: previewBuffer) { self.currentImage = (dataImage, "\(resolvedSettings.uniqueID).dng") showImage() } }更多的选择
为了改变一些设置,如闪光灯或相机位置,我在右下角添加了一个菜单。它是通过这个函数可见的。
@IBAction func moreClicked() {UIView。动画(withDuration:1.0,动画:{自我.menuView.α=1.0 - self.menuView.alpha }) }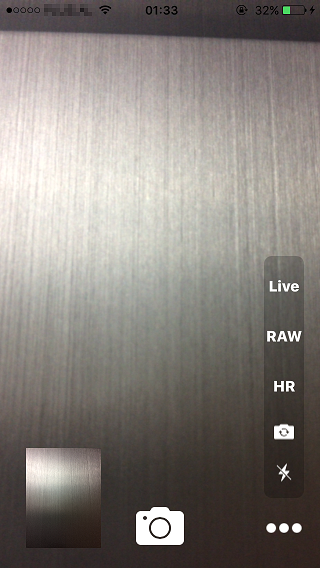
每个按钮都有它的IBAction这是被触发的。
高分辨率
更改按钮文本的布尔值和字体。
@IBAction func toggleHR(button: UIButton) {highResolutionEnabled = !font = highResolutionEnabled ?UIFont(名称:“System-Thin”,大小:15):UIFont(名称:“System-Thin”,大小:15)showToast(文本:“高分辨率:\(highResolutionEnabled)”)}然后将以下参数设置为AVCapturePhotoSettings.
设置。isHighResolutionPhotoEnabled = self.highResolutionEnabled相机的位置
改变位置并重新载入相机。
@IBAction func toggleCamera() {if cameraPosition == .back {cameraPosition = .front showToast(text: "Camera: front")} else {cameraPosition = .back showToast(text: "Camera: back")} loadCamera()}闪光
由于flash模式有三个可能的值,因此使用开关情况来循环选择。按钮上的图像是相应设置的。
@IBAction func toggleFlash(按钮:UIButton){切换自我。flashMode {case .off:自我。flashMode=.on showToast(text: "Flash mode: on") button.setImage(UIImage(named: "FlashOn"), for: .normal) break case .on: self.flashMode = .auto showToast(text: "Flash mode: auto") button.setImage(UIImage(named: "FlashAuto"), for: .normal) break case .auto: self.flashMode = .off showToast(text: "Flash mode: off") button.setImage(UIImage(named: "FlashOff"), for: .normal) break } }在捕捉图像之前,设置更新为flash模式(如果可用)。
如果cameraOutput.supportedFlashModes。contains(NSNumber(value: self.flashMode.rawValue)){设置。flashMode = self。flashMode}生
前面我们看到了如何捕获生形象,但要在两者之间切换生普通的照片,我们需要下面的功能。首先,我们检查它是否可用来捕获生然后进行类似于高分辨率切换功能的图像。
@IBAction func toggleRAW(button: UIButton) {if cameraOutput.availableRawPhotoPixelFormatTypes.count == 0 {showToast(text: "RAW not available") return} rawEnabled = !rawEnabled按钮. titlelabel ?font = rawEnabled ?UIFont(名称:“System-Thin”,大小:15):UIFont(名称:“System-Thin”,大小:15)showToast(文本:“RAW: \(rawEnabled)”)}生活
的值。生活变量在加载相机时设置。不可用时为-1,打开或关闭时为0或1。
@IBAction func toggllive(按钮:UIButton){切换live{情况。不可用:showToast(文本:“实时照片不支持”)中断情况。打开:live = .关闭showToast(文本:“实时:关闭”)按钮。font = UIFont(名称:"System-Thin",大小:15)break case . off: live = . on showToast(文本:" live on")按钮。font = UIFont (name: "System-Heavy", size: 15) break}}我们还需要设置url在拍摄照片之前,请在“设置”中获取视频文件。
如果自我。生活==.在{让path = "\(NSTemporaryDirectory())/Photoshot_\(settings.uniqueID)" settings.livePhotoMovieFileURL = URL(fileURLWithPath: path) }结论
AVCapturePhotoOutput这使得在你的应用程序中实现相机功能变得简单。这篇文章是一个简短的介绍如何使用这些功能。
我希望你觉得它有趣而且有帮助。
愿法典与你同在。
参考文献